Showing posts with label Dissecting malware. Show all posts

Saturday, August 6, 2011

Analyzing Malware - Manually unpacking the specimen

In continuation to reverse engineering malware series, this is the fifth post. I will recommend that you read my firstsecondthird and fourth posts to be in sync with whole exercise.

In previous posts, we performed behavioral and code analysis of the malware specimen - slackbot. We identified that the bot executable was packed with UPX packer. Since UPX has native unpacking capabilities as well, we had unpacked the specimen exe and learnt more about its code & operations during code analysis. Subsequently we were able to gain control over the bot.

What if, the malware exe was packed with a packer which has no native unpacking capabilities. In such a case, the exe will have to be extracted manually. In this post, I will cover how Packing works and take you through manually unpacking a UPX-packed exe.


Packing
Packing is simply compressing and / or encrypting the executable. The actual code in a packed executable is obfuscated as well as the overall file size is reduced. This creates two prime benefits to a malware creator / attacker / user:
  1. Low probability to get identified by AV / malware scanners.
  2. More difficult to analyze since the actual code is now obfuscated.
  3. Easy distribution and faster loading into memory becomes possible due to low file size, for example, in drive-by downloads, trojans etc.
A packed executable has 2 components:
  1. Unpacker routine
  2. Packed original code
Original program ---> passes through ---> Packer ---> New program [ Unpacking routine + packed original program ]

The packer compresses and / or encrypts the original program and creates a new executable. The new executable carries the unpacking routine and the packed original program. The unpacking routine is responsible to unpack the original program when the new, packed exe is run. The original packed exe is unpacked into the memory of the system when unpacking stub is run. Prior to this, the original program can not be fully read in clear.


How does a [ UPX ] packed executable run?
Generally speaking, once a packed exe is run, the packed code [ both the unpacking routine and the packed original program code ] is loaded up in the memory. The program run starts at Original Entry Point [ OEP ]. In simple terms, OEP is like the main() function, in C, C++, C# etc programming languages. That is, OEP is the starting point of the program - the first instruction from where the execution will begin. 

In case of a packed exe, the OEP points to the start of unpacking routine. This is because unless the unpacking routine executes, the original code can't be unpacked. When the unpacking routine has finished its run, the execution pointer jumps to the first instruction of the original program. This jump can be a simple JMP or may be tricky utilizing SEH / CALL / RET. Post jump, the actual unpacked program runs.

When UPX packs an executable, it consolidates all exe sections - .text, .data, .idata, etc - into one section called UPX1. This section UPX1 also contains the unpacking / decompression program stub. There are 2 other sections called UPX0 - has nothing - and UPX2 - has data & imports table.


This is the reason that when will try to open a packed exe in a disassembler such as IDA, it will throw an error, basically cos right now, it can't differentiate between code and data.


IDA will still load the packed exe. If we look at the program in text view, we will find IDA automatically identifies & marks UPX sections appropriately.


UPX0 is uninitalized space in the start. At runtime, the stub in UPX1 will decompress the packed code to the UPX0. After this, a Jump is made to the start of UPX0, where now the original program resides. At this point, the EIP [ Instruction pointer ] points to the first instruction of the unpacked program.


Image credits to "The Rootkit Arsenal"


PUSHAD pushes contents of all the registers on to the stack.
POPAD pops out the contents from the stack back into the registers.
JMP takes the instruction pointer to the start of unpacked code.


Import Address Table (IAT) -> Simply put, a program has dependencies on dynamic link libraries [ DLLs ] and loads the required DLLs at runtime. The memory locations of these DLLs are dynamic. Therefore, it is not feasible to hard-code memory address of functions in these DLLs, into the program. Import Address Table comes to the rescue. IAT is a table of pointers to functions in the required DLLs. So, whenever a compiled program has to access a specific function, it can do so by making a CALL to the appropriate IAT record. Packers generally damage / modify the original IAT of the packed program so the incorrectly dumped program code fails to run. This basically means, a packer modifies the IAT by defining afresh which dlls and functions need to be loaded and how & where to put the pointers in order to ensure normal run of the original program, post unpacking.

The IAT is accessed by a CALL[<address_to_pointer>] instruction.

Okay, let's roll up our sleeves and start with dumping the unpacked code directly from the memory.

Fire up OllyDbg and load the packed exe. Do not press the 'Play' button. Observe that when we loaded the packed exe into Olly, it has halted at the address 00408760 - PUSHAD instruction. This is program entry point [ look at the bottom, message bar in Olly ]. We already know that UPX1 constitutes of the unpacking routine and the packed program code. So, this address 00408760 seems to be the start address of unpacking routine.

Note this address down somewhere.

Now Check the Memory Map by clicking on the 'M' button in the menu bar. Memory Map is simply a mapping between a loaded executable / library and the memory regions. You will find section UPX0 starts at address 00401000, and UPX1 from address 00407000.


This is how it flows. Starting from PUSHAD at 00408760, the unpacking routine runs and unpacks the program code. In addition to this, the Import Address Table is fixed so the original unpacked program code may run good. CALL DWORD PTR DS:[ESI+8094] in the figure below is referring to the Import Address Table.


When the unpacking code run is finished, and IAT is fixed, POPAD instruction pushes out the contents of registers present on stack, which was initially put by PUSHAD, back into the registers. Finally a JMP is made to the freshly, unpacked code. In our case, as per screen above, JMP happens at address 004088AF ---> JMP fid.004011CB.


004011CB must be the address where the unpacked code starts. 

Go to this address using Ctl+G.Once at this address, we will use a plugin for OllyDbg - OllyDump - to dump the code. Go to Plugins menu -> OllyDump -> Dump debugged process.


OllyDump identifies the start address, entry point and show UPX section info automatically. Now we need to modify the entry point. Remember, you noted the Program Entry Point 00408760 earlier. The actual unpacked code starts at 004011CB. So, we will modify the entry point to 004011CB. Dump the code now, and we save it as fid_unpacked.exe.


Let's confirm if the exe we've just dumped is indeed unpacked.


Open PEiD and load the new dumped exe into it. As you will see, the EntryPoint is 11CB now, which look correct, and packer info tells us it is Microsoft Visual C++ 8.


Cool! We were able to manually unpack the specimen. Now that we have the unpacked specimen, we can perform code analysis using techniques shared in Code Analysis post.

##################################################

If you have any questions or feedback, do post a comment below.

Thanks.

Sunday, July 31, 2011

Analyzing Malware - Patching in the way!

This is in continuation to my previous posts on reverse engineering malware. Therefore, I would strongly recommend that you go through the posts one, two, and three, before moving forth with this one. 

If you recall, in the last post, we used disassembling and debugging techniques on the specimen to our utility and successfully identified the correct IRC login password.

But is there a way to simply modify or bypass this whole password protection mechanism in the bot? If authentication process can be controlled, that'd be awesome. So, here it is; this post will show you just that.

Objective: To modify the malware executable so we can control the authentication process.

How: Via Patching the executable.

Patching in RE universe refer to making such modifications to a compiled specimen executable, which will change the flow of program execution.

In our slackbot.exe specimen, we will get around with the password authentication by patching JNZ instruction.

Let's commence.

We will load up unpacked malware exe in IDA and work on !@login command block, since !@login is a privileged command, i.e. requires authentication. You can locate !@login in the code by pressing Alt-T and searching for it.

Here's what the program flow looks like for the !@login block:

As you see, the top block [ Block 1 ] checks if the user entered command is '!@login' or not. If it is, then the program flow moves to the left, middle block [ Block 2 ]. If it is not, then move to down, right block [ Block 3 ]. We are interested in Block 2. You see the last instruction in this code block is ---> jnz short loc_40210D

If you've read this post, you will understand that this Block 2 is the place where password authentication takes place. If the password entered by the user in the IRC channel does not match with the actual bot password, then the program execution flow jumps to memory location 40210D.

Here's the text view of the same routine:

Instruction JNZ is at memory location 4020C3. If the strings do not match, the program takes JNZ route. If the strings do match, then 'pass accepted' is pushed on to the stack, and program execution continues. The user can then execute any privileged commands.

Our first attempt will be to somehow bypass this JNZ jump at 4020C3. The most easy way to do this will be to remove this instruction and replace it with NOPs [ \x90 in hex or 90 in dec ]. NOPs are No Ops, that says, do nothing and move on, to the cpu. Remember to keep the check box 'Fill with NOPs' ticked. It's the default and it replaces the original instructions with \x90.
No JNZ --> no jump --> 'pass accepted' --> privileged access.
Open up the unpacked executable in OllyDbg, press the 'Play' button.

Next, we will find the address 4020C3 in the memory. Press Ctrl+G, type 4020C3 and Ok. This will locate for us the JNZ instruction. 

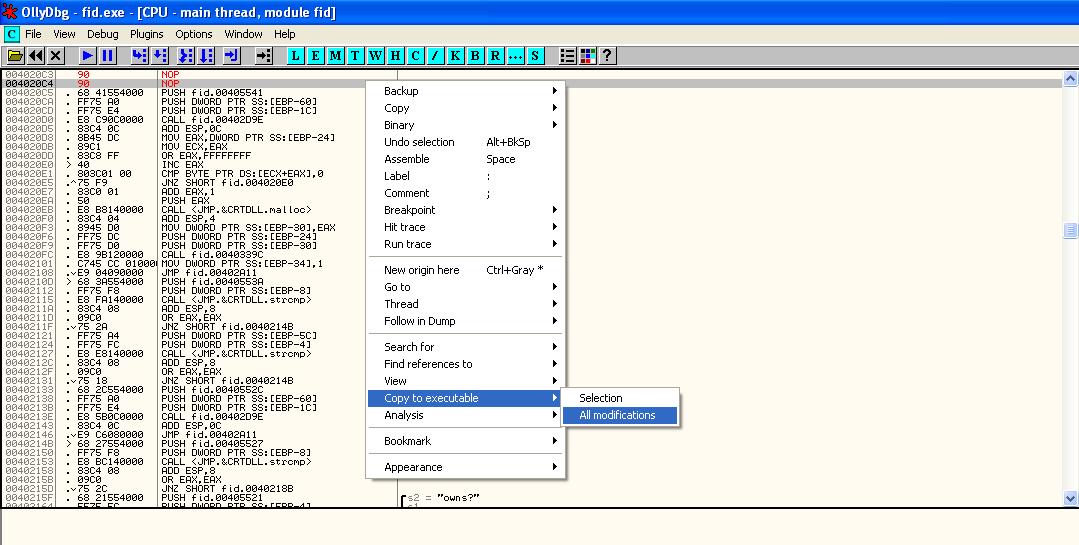
Now press spacebar. A box will pop up and here we will enter "NOP". 


After this, simply 'Assemble' the modified executable.


Now you will see new instructions '90' have been added on addresses 4020C3 and 4020C4. And that's it. We have a modified bot exe, which doesn't care what password we enter.

Let's test this out in the IRC channel.

Start the IRC server on the analyst's system, connect first to the channel #jigyaasa so as to get the OP role.


Voila! Even though I entered a wrong password, bot allowed me in and I can execute privileged commands such as '!@execute'.

You can go ahead and save the modifications made into the executable.


To conclude, we learnt how an analyst can leverage OllyDbg to patch the malware specimen, thereby, bypassing the inbuilt authentication mechanism and gaining privileged access.

I hope these articles are useful to you. Share your comments and feedback if you liked these or if you have any questions.

Saturday, July 9, 2011

Analyzing malware [ slackbot ] - II

This is in continuation with the part 1 of Analyzing Malware [ slackbot ].

Code Analysis
In this phase of reverse engineering malware, we will look inside the code of the specimen.

We will use IDA pro, a disassembler, to open the malware exe and attempt to understand the logic behind the flow of the execution. A disassembler translates machine language into assembly language.

You can get IDA Pro here: http://www.hex-rays.com/idapro/

Fire up IDA and open up the unpacked malware exe from C:\WINDOWS\.


Once you open up the specimen, you can see the instructions in graph view or in the text form. Press Alt-T to find an occurrence of !@id in the program.


In the screen cap below, I have highlighted the code block for !@id


The instruction at 00401B9E pushes the value !@id on to the stack. The next instruction at 00401BA3 is then putting some string value to the stack. At this point, this seems to be the command entered by the bot herder / creator or the analyst at the IRC channel #jigyaasa. The next instruction is a call to strcmp, for string comparison. It appears to be comparing the 2 values that were pushed on to stack earlier. So, simply it is trying to confirm if the string value at 00401BA3 [ i.e. the command given to the bot ] is !@id or not. If both the values match, then EAX register value is set to 0.

Later you see, the instruction at memory location 00401BAE is performing an OR between EAX and EAX. It is checking to see if the value in EAX register is 0. The logic behind OR instruction is as follows:


If A = 1 and B = 1, then A OR B = 1
If A = 1 and B = 0, then A OR B = 1
If A = 0 and B = 1, then A OR B = 1
If A = 0 and B = 0, then A OR B = 0


That is, if both the variables has a value 0, only then the output of OR operation will be 0.


Following this, you see there is a JNZ instruction. JNZ is 'Jump if Not Zero'. This means, if the EAX is NOT 0, then the execution flow will jump to the memory location 401C53. Else, the execution will continue.

In the next few instructions that follow, the time function is called. Therefore, when we entered the !@id command earlier in the Behavior Analysis phase, the bot returned the current system time as the response.

Note also, there is no other string comparison happening in this block for !@id command. It would be hence safe to consider that this command does not take any parameters.

Let's move on to a more useful command, !@login. Recall that when we entered this command in the channel earlier in the Behavior Analysis phase, we did not receive any response from the bot. It is quite possible that this command requires a parameter.

Below is the graph view of the code block for !@login.


We see in the top block, the same logic is taking place as that happened for !@id. The string !@login and another string is pushed on to the stack, strcmp is checking if both of these are equal or not and based on the output, decides the flow of execution. Hence, there are two logical response paths originating from this block.

First let's look at the left upper block. We see there are two strings - str1 and str2 - pushed on to the stack. Then there is a call to strcmp function and consequently, based on the result, either the execution continues to another code block [ follow the red line down ] without any jump Or the execution reaches the memory location 40210D, which is the second response path from the top block, on the right.


Here is the text view of the top block.


You see, at location 004020C5, there is a comment 'pass accepted'. If you follow upwards from here, you will find this response will occur when the EAX register is 0, that is the str1 and str2 values are equal.

To give a quick conclusion of !@login block observations, there are 2 comparisons happening in here:

1. First strcmp at location 00402093, confirms if the command entered is !@login or not. If it is not, then the execution jumps to location 40210D.

2. If the command is indeed !@login, then the second strcmp at memory location 004020B9 confirms whether the 2 string values - for str1 and str2, pushed to stack at memory locations 004020B5 and 004020B6 respectively - match or not. The string value most certainly is the password which is to be used to authenticate to the bot.
If the strings match, EAX = 0, and the message at location 004020C5 is printed out. Else, the execution flow jumps to location 40210D.

Do re-read the above details again before you move on to the following steps.

After this session with the disassembler, we have some understanding of how the authentication is to work in this specimen.

Now it is time to trace the process execution flow. We will use Ollydbg, a simple to use and very powerful debugger for this task.

You can get Ollydbg here: 

From Wikipedia,
OllyDbg is an x86 debugger that emphasizes binary code analysis, which is useful when source code is not available. It traces registers, recognizes proceduresAPI calls, switches, tablesconstants and strings, as well as locates routines from object files and libraries
Start the IRC server, and connect to the channel #jigyaasa from your analyst's / linux box.


Fire up Ollydbg and open the malware exe from C:\WINDOWS. Once it loads up in Ollydbg, press on the Start button - looks like the Play button. The execution is 'Paused' by default [ look at bottom right corner ].


From information gathered using disassembing the malware exe earlier, we know that the strcmp call which checks the two strings - str1 and str2 - in the !@login code block, is at memory location 004020B9.

This means that every time there is an authentication attempt made to the bot, the program execution will be passing through the memory location 004020B9. Therefore, we will now create a breakpoint at this location. This will help us analyze the state of registers and values at the point of authentication.

Press Ctrl+G, type 004020B9 and Ok. This will find the memory location of the strcmp call. Note that you may have to do a find twice. It's a little bug in Ollydbg.


Once you are at the memory location 004020B9, right click anywhere and create a breakpoint from the menu. Or simply press F2 key to create the breakpoint.


You can see the address turns red in color as soon as the breakpoint is set.


Now go to the IRC channel and enter !@login <any_password>. In our case, I entered !@login botpassword. You will not get any response. But look at the Ollydbg now. The breakpoint has been hit. The execution paused at location 004020B9, i.e. the strcmp call.


If you look at the stack pane of Ollydbg, which is the bottom right, you will see some interesting values. You see here that the locations 0012F7E8 and 0012F7EC point to addresses on stack where the values for strings s1 and s2 are stored. Here we are able to see the s1 which is the password we entered at the IRC channel, and s2, with which our password is being compared to. The value of s2 is "jigyaasa" and this will successfully authenticate us to the bot.


We have found the correct password. So you now go ahead and kill the malware process nwhyy.exe, and run it again, through Ollydbg.

Once the bot joins the channel, enter the command:
!@login jigyaasa

You see that the bot now responds with 'pass accepted'. Try to run a command remotely using:
!@run notepad.exe
The bot responds with 'file executed'. Let's see the screen at the Windows XP box where the bot is installed. We see the command has executed successfully and 'notepad' is opened remotely.


To conclude this exercise with today's notes, we studied some code elements of the specimen and were able to understand its command execution flow. We used IDA Pro disassembler and Ollydbg debugger to gain insight into the malware's structure and operations. In the end, we have been able to authenticate and gain control over the bot.

You can now remove the bot from the lab test machine by entering
!@remove


Finally. do remember to revert your Windows VM infected with slackbot.exe to a previous clean snapshot.

++++++++++++++++++++++++++++++++++++++++++++++++++

Though I've tried to cover the analysis process correctly and with as much detail as possible, I am no expert. So in case you find any error, or have questions & feedback, feel free to comment. I'll appreciate it.

Analyzing malware [ slackbot ] - I

Before starting along these analysis posts, I suggest you to read this post in order to gain understanding of the methodology to reverse engineering malware, my malware lab setup, & study resources.


Behavioral Analysis

In this phase, we will observe the various behaviors exhibited by the specimen. We will monitor the following:
1. File system changes
-> Identify and record any additions, updates, deletes made to the file system and registry by the specimen
2. Network access
-> Identify and record any new listening ports, and outgoing connection attempts
: IP addresses, ports, and services.

Before starting analysis and / or executing the malware specimen, we must document the md5sum / sha1sum of the executable. We will see why, in a moment.


We will now use RegShot to take snapshots of Windows registry. You can get it from sourceforge [ http://sourceforge.net/projects/regshot/ ]
From the RegShot project page,
Regshot is an open-source(GPL) registry compare utility that allows you to quickly take a snapshot of your registry and then compare it with a second one - done after doing system changes or installing a new software product.
Remember to check 'Scan dir1' as this will enable monitoring any changes made to C:\. If you have multiple locations you'd like to include, you can put them along with C:\. This first shot will act as a baseline of a clean system, i.e. before infection from the malware.


Next, we are going to use CaptureBAT. This utility is freely available from the Honeynet project [ https://www.honeynet.org/node/315 ]

From the CaptureBAT project site,
This is a behavioral analysis tool of applications for the Win32 operating system family. Capture BAT is able to monitor the state of a system during the execution of applications and processing of documents, which provides an analyst with insights on how the software operates even if no source code is available. Capture BAT monitors state changes on a low kernel level and can easily be used across various Win32 operating system versions and configurations. CaptureBAT is developed and maintained by Christian Seifert of the NZ Chapter.

We have configured CaptureBAT to log any read / write access attempts to registry, as well as log network traffic.

Open up 'Process Explorer' - procexp.exe. Process Explorer is a handy utility by Sysinternals, now under Microsoft umbrella.

From the Process Explorer project site [ http://technet.microsoft.com/en-us/sysinternals/bb896653 ],

Ever wondered which program has a particular file or directory open? Now you can find out. Process Explorer shows you information about which handles and DLLs processes have opened or loaded.
The Process Explorer display consists of two sub-windows. The top window always shows a list of the currently active processes, including the names of their owning accounts, whereas the information displayed in the bottom window depends on the mode that Process Explorer is in: if it is in handle mode you'll see the handles that the process selected in the top window has opened; if Process Explorer is in DLL mode you'll see the DLLs and memory-mapped files that the process has loaded. Process Explorer also has a powerful search capability that will quickly show you which processes have particular handles opened or DLLs loaded.The unique capabilities of Process Explorer make it useful for tracking down DLL-version problems or handle leaks, and provide insight into the way Windows and applications work.
Once all the monitoring is in place, go ahead and execute the malware specimen and wait for 30-60 seconds. You will find that slackbot.exe actually spawned another process '<random_chars>.exe'. The process name is a random text. Kill this process by selecting it in Process Explorer, right click and 'Kill Process.'

Stop CaptureBAT by pressing 'Return / Enter' key.

Post Infection
Let's take second snapshot of the registry now.


Once second snapshot is taken, you'll notice that 'Compare' button has highlighted. Go ahead & press 'Compare'. This will compare snapshots before and after malware infection. The output file is stored in C:\, as it's set the Output path.


RegShot output log shows us all the keys that were added, modified and deleted by the specimen.

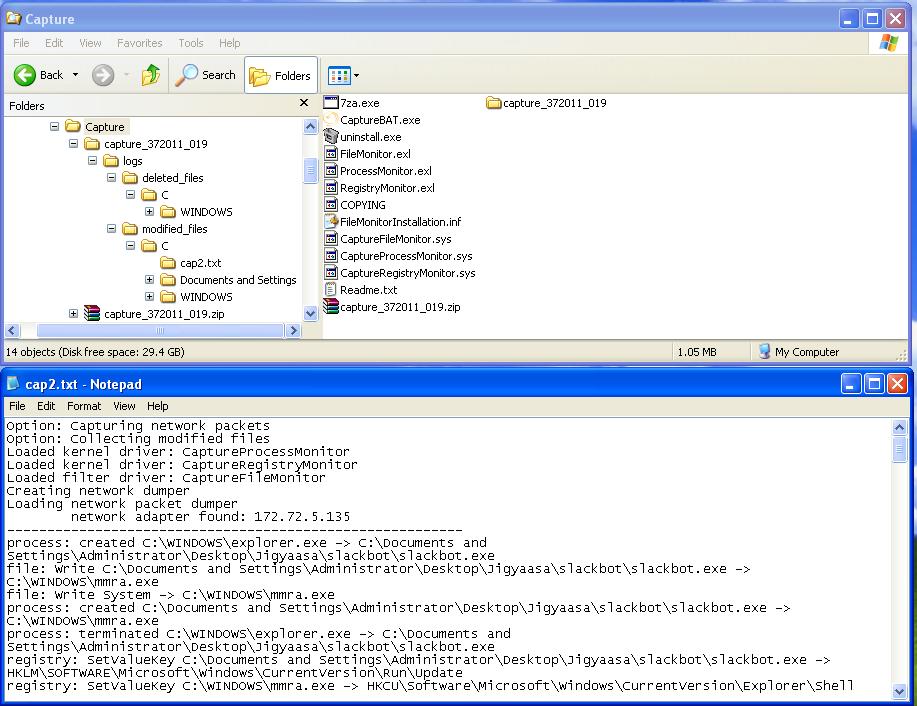
Let's also look at CaptureBAT log output. 


CaptureBAT log output clearly shows the malware specimen has accessed the file system, added new files, and modified existing files. Any network traffic sent out is also captured in the form of .pcap files, which can be opened up in Wireshark. CaptureBAT also saves any deleted files and modified files retaining the appropriate directory structure where the change occurred. Also, notice in the log, that the slackbot.exe creates a new process, mmra.exe, in C:\WINDOWS\ directory, and then kills itself.

Let's take a md5sum of this new executable.
Note: I ran the malware once more during testing, so the new exe name will be different in the following screen caps. Just FYI... the file name does not really matter.


When we started above with md5sum, I had mentioned we will see the necessity of md5sum during malware analysis in a moment. Here it is... we see that the md5sum of both the original specimen exe and the new executable nwhyy.exe, which was spawned out from the slackbot.exe, has the same md5. This means that both the files are exactly the same. The slackbot.exe simply copied itself over to C:\WINDOWS.

Now let's take a pause and review what we have found until now.

1. The malware specimen is creating a copy of itself and runs from the new location [ C:\WINDOWS\ ]
2. Registry entries are modified to start the specimen exe once the system starts
3. There is a potential outbound network access attempted

It's time now to start looking into the new specimen exe nwhyy.exe for any readable strings. It may give us some hint.

To do this, we can either use the 'strings' utility on *nix based or on Windows systems.

man strings
DESCRIPTION
       the options below) and are followed by an unprintable character.  By default, it only prints the strings from the initialized and loaded sections of object files; for other types of files, it prints the strings from the whole file.
       strings is mainly useful for determining the contents of non-text files.
      For each file given, GNU strings prints the printable character sequences that are at least 4 characters long (or the number given with
On Windows based systems, we can also use 'Bintext' [ http://www.mcafee.com/us/downloads/free-tools/bintext.aspx ]

From the BinText project site,
A small, very fast and powerful text extractor that will be of particular interest to programmers. It can extract text from any kind of file and includes the ability to find plain ASCII text, Unicode (double byte ANSI) text and Resource strings, providing useful information for each item in the optional "advanced" view mode. Its comprehensive filtering helps prevent unwanted text being listed. The gathered list can be searched and saved to a separate file as either a plain text file or in informative tabular format.


As you see, there is not much readable text obtained, implying that the specimen code is obfuscated in some way. If you look at the text in the upper 2-3 rows of the strings / bintext output, you'll notice that it is telling us about UPX.

UPX is a well-known packer [ http://upx.sourceforge.net/ ]

From the UPX project site,
UPX achieves an excellent compression ratio and offers very fast decompression. Your executables suffer no memory overhead or other drawbacks for most of the formats supported, because of in-place decompression. UPX strengths in a nutshell:excellent compression ratio: typically compresses better than WinZip/zip/gzip, use UPX to decrease the size of your distribution! 


You can read more about UPX on wikipedia: http://en.wikipedia.org/wiki/UPX

Now you know, the specimen nwhyy.exe, is packed with UPX. So, we will just go ahead and decompress the specimen with UPX itself. In cases where we do not know which native packer has been used to pack the malware specimen, we will have to unpack the specimen manually, which is a different process altogether.


UPX decompresses the file and replaces the original file, nwhyy.exe.

Let's see if we can find any readable strings in this unpacked exe.


Cool! Now you can see several readable strings in the exe. The highlighted text in the above screen capture looks like commands and respective response messages.

Let's look at the md5sum again w.r.t this new unpacked executable.


As expected, the md5sum of the last exe is different than the original slackbot.exe. This nwhyy.exe is a new, raw, unobfuscated malware executable.

Now that we have identified and documented file system related changes done by the malware specimen, we will proceed to identify network related events / actions.


Wireshark is the go-to tool for network traffic monitoring. Let's fire up wireshark and run the executable again.


Here you see that the malware is trying to resolve the following three domains:
1. sb.webhop.org
2. malware.lab.server [ this is the custom domain I configured into the malware specimen ]
3. irc.slim.org.au


In order to gain insight into what and why of these network access attempts by the malware, we will give it what it wants. It is sending out name resolution requests to get the IP address of the domains, so we will give it the IP address. The catch is, we will tell the malware that the domain(s) it wants to reach, refer to us, i.e. 172.72.5.1.


One way we can do this, is by modifying the 'hosts' file and adding the IP-hostname mapping in it.


We will start with sb.webhop.org. We will add a IP-hostname entry in the C:\WINDOWS\system32\drivers\etc\hosts file for sb.webhop.org. 


Save the hosts file and ping the domain address. You should receive a ping response from 172.72.5.1.


Once malware is able to resolve sb.webhop.org, we kill the malware process, restart traffic capture in wireshark and run the specimen again. You will see that it is trying to establish a HTTP connection.


Kill the nwhyy.exe through Process Explorer. 


We will now set up a netcat listener on port 80 and execute the specimen. This simple set up with help us gather connection request header info immediately.


Netcat listener is set up using the following command:
nc -lv 80
where
         -l -> listening mode
         -v -> verbose
         80 -> port to listen on
In the connection request captured, we see that the malware is using a custom Referer and User-Agent. Second, the User-Agent is of Windows 98, which is certainly incorrect as the traffic had originated from Windows XP Sp2. 


So overall, this is making the requests seem to come from 'hxxp://psychward.slak.org'. Ads and affiliates, more traffic that comes from affiliate, more commission that goes to affiliate, you see the point.?! 


Kill the process nwhyy.exe now.


Let's move on to malware.lab.server. This is a custom irc server I added to the bot specimen. Botherders can add multiple irc/http servers to act as command-and-control. The bot will then contact these command & control servers in case other servers are unavailable / unreachable.


As earlier, we will add a new hosts file entry to make the domain resolve to us, 172.72.5.1.


You can confirm the reachability by pinging the domain name. It should resolve correctly and ping responses are received.


If you start sniffing via wireshark again and run the malware exe, you will see IRC connection attempts to 172.72.5.1. Since there is no irc server running on our box, the connections are RST back. 


Doing a 'Follow TCP Stream' on the connection originating from 172.72.5.135 - the infected box - we see that this is an IRC request, and the channel is #jigyaasa.


Kill the malware process and now let's start an IRC server [ iirc-hybrid ] on our box.


After starting the IRC server, we join in to the channel #jigyaasa. Joining the channel first, ensures that we have the OP privileges. This privilege is like an admin privilege to be able to control the channel and its users.


Run the malware exe, & you will find a new client is connected to our IRC server, the client originates from 172.72.5.135. Based on the command strings that we found inside the unpacked exe earlier, go ahead & enter some commands in the IRC channel.


You'll notice that the commands !@id and !@sysinfo run fine and give the output out. But commands like !@login and !@run do not show any message, no output or any sign of execution. If you try to talk to the bot with a random text, there is no response. Looking at this behavior, it is certain that there is an authentication mechanism built into the bot. Only once the analyst / bot herder authenticates, can (s)he can run privileged actions like remote execution.


To conclude, we have derived the following info from network traffic analysis:
1. Bot sends HTTP connection requests with modified headers to sb.webhop.org - objective is to increase traffic stats coming from the host [ hxxp://psychward.slak.org ]
2. Bot attempts to connect to a potential command n control server - malware.lab.server, in our scenario - channel #jigyaasa, with a random NICK, and has both unprivileged & privileged commands


++++++++++++++++++++++++++++++++++++++++++++++++++

Now at this stage, we have studied potential ways in which this bot interacts and have collected sufficient information about it. The behavioral analysis phase can be paused for now and we can proceed to the Code analysis phase.